
In this article, I’m going to provide you with the definitive, fool-proof guide on How to Break 90. Why? Because I know that it’s one goal that a huge majority of avid golfers share. “I want to break 90” is the second most common goal that my students have, behind only, “be more consistent.”
I will warn you that this plan is unorthodox. Then again, if doing things the “normal” way worked, you wouldn’t be reading this, would you? Follow this plan and I give you a 100% GUARANTEE that you will have an 89 (or better) in the books in no time.

Get Your Mind Right
A huge part of breaking through any scoring barrier is creating the proper mindset. To break 90, you need to do two things:
1) Realize that 89 is 17 bogeys and 1 par (on a par 72 course). That’s it. I know that every golfer who wants to break 90 has made lots of pars and bogeys before, so there’s nothing involved in breaking 90 that you can’t do already.
2) Pick the right tee box. I’ll deal with the specifics of this shortly, but you cannot go into this with the idea that you have to break 90 from the tips. Breaking 90 is breaking 90, period. If you have to go all the way to the forward tees to break 90, do it. Scoring barriers are mental more than anything else, and once they’ve fallen, they’re down for good. You should want to break them as soon as possible, regardless of the yardage of the course.
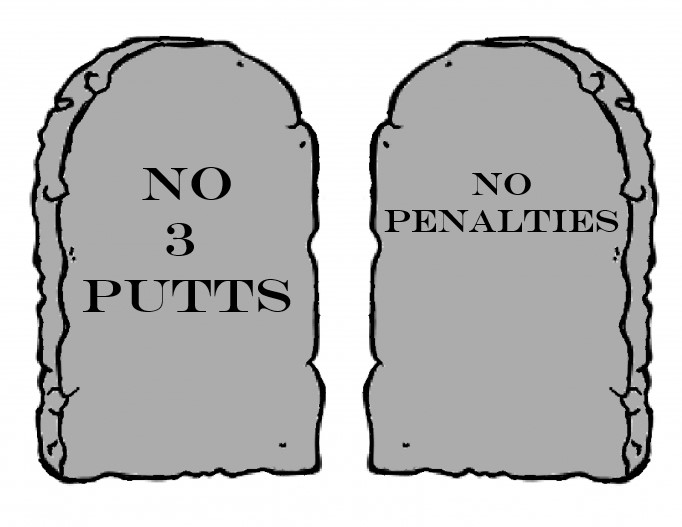
Two Commandments
There are two commandments to Breaking 90. You must abide by these commandments, lest you be doomed to shooting 91 for the rest of your days.
1) Thou shalt not three putt.
2) Thou shalt not take penalty strokes.
Please note that the second one doesn’t mean “don’t count your penalty strokes,” it means “don’t hit it OB, into the water, etc.”
The Shots You Need
To shoot under 90, you don’t need to be Ben Hogan, you only need 3 shots.
1) An iron that you can hit 150 yards or more without ever getting in trouble
2) A reliable pitch shot
3) A good putting stroke
You will notice that the driver is not on this list. You do not need it to break 90. In fact, don’t even bring it with you to the course.

The “Breaking 90” Practice Plan
This practice plan is built entirely around learning, refining, and testing the three shots that you need to break 90. When you can complete each Test, you’re ready to take your game to the course to bag that 89.
Phase 1: The Iron Shot
The first thing you need to do is find out exactly how far you hit your chosen iron (let’s call it a 7I), and each club below it (8I, 9I…). This will be essential for course management.
Next, you need to work on your accuracy and consistency. For accuracy, make sure you’re hitting shots to a target and keeping track of where your misses go. For consistency, the goal is to hit every shot the full distance, whether that’s 150, 155, or 160 yards. Plus or minus a few yards is fine, but you can’t break 90 if you’re laying the sod over the ball.
Finally, spend some of your practice time on your shorter irons. These may come into play as well, depending on the course.
Test: Hit 9/10 iron shots into a 60 foot (left to right) window at least 150 yards away.
Phase 2: The Pitch
This is probably the most difficult part of this plan for most golfers. You will need to develop a reliable pitch shot that will allow you to hit a green from 20 to 100 yards away. The method you use does not matter: you can use Dave Pelz’s “Clock” method, a Stan Utley pitch, or whatever homebrewed method you concoct. The key is reliability.
You do NOT need to go flag hunting. This plan is based on hitting the green, not knocking down pins. Practice hitting shots to the biggest, safest part of the green, just like you will on the course.
Part of why this is so difficult is that good short game practice facilities are hard to come by. If you don’t have one, improvise. Take some buckets or towels and place them on the range at varying distances. Just be sure to clean up after yourself.
When you practice, don’t hit the same length shot over and over; this is not how you will play on the course. Hit a 50 yarder, then a 20 yarder, than a 90 yarder. Keep track of the distances that are best and worst for you. This will be important for your course management.
Test: Hit the green 10/10 times from varying distances. Don’t hit the same length shot twice in a row or more than twice overall.
Phase 3: The Putt
The primary thing that you need to do is lag putt well and clean up your short putts, so build your practice around that. Here are some sample drills:
Set up 4 balls around the hole at roughly 3 feet and make all of them. Repeat until you’ve made 20 in a row.
Put 3 balls at 3’, 5’, and 7’, all on the same line, for a total of 9 balls. Make all the 3’ putts in a row, then move back to the 5’ putts then the 7’ putts. The goal is to make 9 in a row. If you miss, start over.
Drop 3 balls at 30’ (or 40’, 50’, etc). Putt each of them towards a cup or a tee. If the balls end up within 3’, you win. See how many wins you can get in a row.
Test: Take one ball and drop it anywhere from 10 to 60 feet from the cup. Putt it until you hole it out. Do this 21 times, from 21 different spots. If you can complete this in 36 or fewer strokes, you pass.

The Game Plan
Par 3’s
These holes will provide your best opportunity to make the one par that you need, but they can also be the holes that derail your round. Let’s discuss some specifics:
150 yards or less: These are your best opportunities to make your par. Choose the appropriate club, aim for the center of the green, and make your best swing. With a little luck, you might even make a birdie and give yourself the chance to shoot 88 or better!
150-200 yards: These are the most dangerous holes because of the temptation to go for it. Put your long irons away, and find a nice safe landing area short of the green. These holes, if well managed, are still great par opportunities because your pitch shots should be very short.
200 yards or more: Strangely, I like these holes better for our plan because there is less temptation to go for it. Find a safe landing area that will give you a nice angle into the green. There’s no requirement that you hit your 7I from the tee: if the best landing area is 140 yards away, hit your 8I followed by a 60 yard pitch. Remember that the angle of your approach can be every bit as important as the distance.
Par 4’s
These are your bread and butter holes for this strategy: two 7 irons, a pitch, and two putts.
300-330 yards: These holes will provide excellent opportunities to make a par, but you will need to focus on good decision making and course management. After a good tee shot, you will have 150-180 yards left. On the short end, you may consider hitting another 7I straight into the green. If there’s not too much trouble by the green, or if you’re hitting the ball very well, this can be a great choice. If you’re too far out or don’t have the confidence, consider your best wedge distance, the safest landing area, and the best angle into the green when planning your second shot.
3330-370 yards: Most of your par 4’s will probably be in this range. After a good tee shot, you will want to consider what the best second shot club will be. As with the short par 4’s, consider not only your best wedge distance, but also the best angle and safest landing zone.
370-400 yards: These holes will require two strong 7I shots to get you within wedge range. Resist the urge to try to hit your 7I 170 yards off the tee, you don’t need it! Stick to the plan!
If you have par 4’s that are longer than 400 yards, you’re probably playing from the wrong tees.
Par 5’s
Unquestionably, the Par 5’s are the holes that will most test your commitment to the plan. Your driver will beg to come out (this is why you should leave it at home!). Remain committed to the plan and you will be rewarded.
Even when you hit “only” a 7I off the tee, the Par 5’s can be a great scoring opportunity. If the hole is playing 450 yards or less, you can hit your GIR with three good 7 irons. From 450-500 yards, you will have great opportunities to set up your favorite wedge distance and an optimal angle into the pin. When the holes stretch out to 500-550 yards, you will be tested: you will need four quality shots to hit the green.
Remember: Keep the ball in play and aim for the center of the green.

In Case of Emergency, Read This
As the old boxing cliché goes, “Everyone has a plan until they get hit in the nose.” It’s easy to sit here and think about hitting every fairway and green, but what about when things go wrong? Here’s what to do and what to avoid.
If you miss a fairway
Don’t panic. Play a safe shot that will get the ball back in play. Advance the ball towards the hole if possible, but this is secondary to getting the ball safely back into play. If you can advance the ball to within 150 yards, play your next shot into the green. If not, lay up to your best yardage and try to make a putt.
If you miss a green
Don’t panic. Don’t attempt a Mickelsonian all-or-nothing shot to try to “get one back.” Play a safe shot that will get the ball onto the green and try to make a putt.
If you make a double bogey
Don’t panic. Stick to the plan. The only thing that has changed is that you have to make one more putt. That’s it. The course will give you plenty of opportunities for that.
Bottom Line
Don’t panic. Don’t deviate from the plan. If something goes wrong, get the ball back on course and try to make a putt.

Conclusion
I hope you’ve found this plan helpful, and I hope that some of you give it a try. It’s definitely unorthodox, but I think you will find that it is also quite effective.
Reach out to us at:
@ImagenGolf on Twitter
For more information on online coaching,
Visit us www.ImagenGolf.com
© Imagen Golf - 2020